The purpose of this week’s field activity was to collect
data at The Priory using a Trimble Juno GPS unit (image 1). This data will be
the beginning to an ongoing database of what The Priory has to offer, in
regards to recreation and sportsman’s activities, and to begin restoration of
the grounds. Features of interest include: trails, benches, erosion points,
notable views, large/notable trees, dead trees (with lots of woodpecker holes),
human objects (garbage, dumps, fences, deer stands, etc.), bluebird houses,
animal signs/track, etc. However, the goal of this week’s field activity wasn’t
just to collect this type of data; we also learned how to develop a data
collection procedure from the ground up. To do this by each team decided on a feature/s
to collect data for. It was each team member’s responsibility to develop a
geodatabase that housed their GPS data, and apply appropriate attributes and
domains to the database. After the data collection procedure we combined our
group data together in the geodatabase.
Image 1: Trimble Juno
GPS unit used to collect data

Study Area
The area where the data collection took place was located on
the outskirts of Eau Claire, WI at a place called The Priory (image 2). This
land parcel was recently purchase and is now owned by the University of
Wisconsin Eau Claire. This space is now utilized as the university day care
center. Within the parcel is a large wooded area containing many trails,
benches, and wildlife.
Image 2: Locational
map of the The Priory in Eau Claire, WI where the data collection activity took
place

Methods
Setting up the
FoldersTo begin this exercise we first had to create a geodatabase and deploy the geodatabase for ArcPad to the Juno GPS unit for the field data collection. To do this each team decided on a feature/s to collect data for. Our team chose to map and collect attributes for trails. First, we had to create a folder, within our class folder in the W drive, to store our information. We titled this “CheckInOut_username”. For example, mine was title CheckInOut_olsonton. Then, we had to create a geodatabase within that folder titled Priory_username (Priory_olsonton). Next, had to create our feature class within the geodatabase. The feature class type is based on the type of data you are collecting. In our case, we chose trails; therefore our feature class type is a line feature class (image 3). We were instructed to set the projection for the feature classes to NAD_1983_HARN_Wisconsin_TM meters.
Image 3: Folder, geodatabase,
and feature class locations for data collection within our class folder

Image 4: Setting
domains within a geodatabase

Next, a project needs to be created to link your data to. First, I added the trails feature class I just created. I added this feature class first because it was in the desired projection. By adding this first I set my data frame projection to this due to ArcMap’s project on the fly feature. Next I added a raster image of Eau Claire and Zoomed into the priory. Then I added a boundary feature class of the location so I would be able to see the proximity in which were collecting data for (image 5).Finally I used the extract by mask tool to clip a large portion of the raster as it was unnecessary for the activity and raster files take up a lot of memory space.
Image 5: Project for
data collection

To do this you first, you need to make sure the Arc Pad Data
Manager is selected within the extensions (image 6). Do this by simply
selecting customize at the top of the screen, and then extensions.
Image 6: Arc Pad Data
Manager is selected within the extensions

Image 7: Location of
Arc Pad Data Manager within the toolbars selection

Image 8: Location of
the Get Data For ArcPad button on the Arc Pad Data Manager toolbar

Image 9: Selecting
Checkout all Geodatabase layers only on the Action menu bar
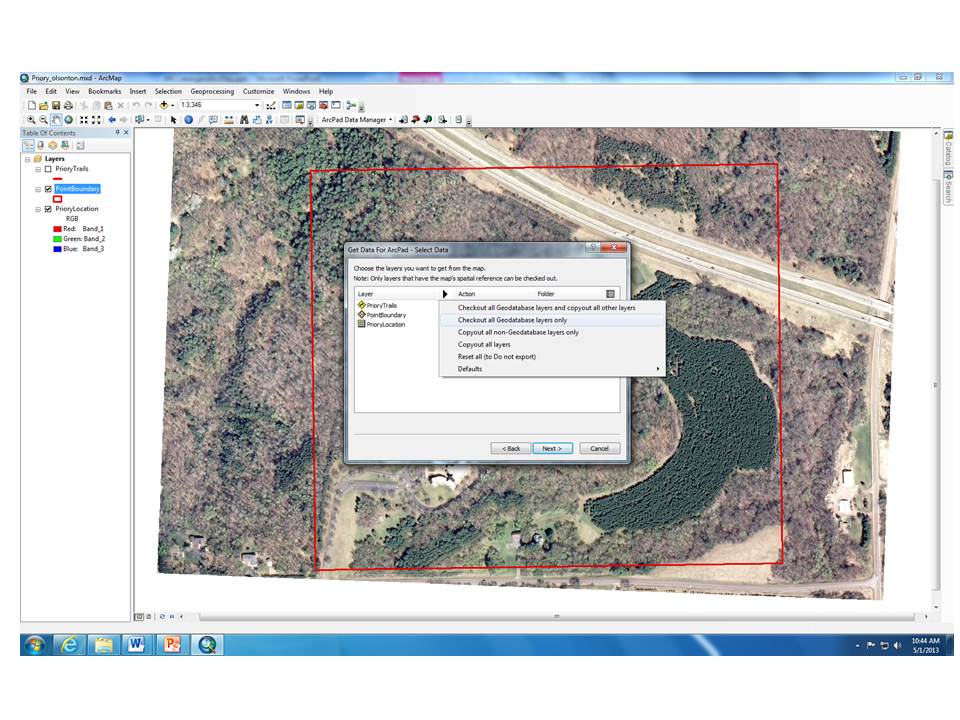
Image 10: Selecting to
Export as background JPEG2000 for the raster file

On the Select Output Options screen<!--[if !vml]-->  <!--[endif]--> under Specify a name for the folder that will
be created to store the data: name it Priory_username (Priory_olsonton) (Image 11).
Make sure you change the path where the file is to be stored (Image 11). Store
the file in the CheckInOut folder created at the beginning of the exercise.
Leave create an ArcPad map (.apm file) for the data checked, and make sure the
.apm file is the same name as your project (Image 11). Finally, if you didn’t
use extract by mask for the raster file while you were creating the project
before deployment, make sure you select The current display extent from the
drop down arrow (Image 11).
<!--[endif]--> under Specify a name for the folder that will
be created to store the data: name it Priory_username (Priory_olsonton) (Image 11).
Make sure you change the path where the file is to be stored (Image 11). Store
the file in the CheckInOut folder created at the beginning of the exercise.
Leave create an ArcPad map (.apm file) for the data checked, and make sure the
.apm file is the same name as your project (Image 11). Finally, if you didn’t
use extract by mask for the raster file while you were creating the project
before deployment, make sure you select The current display extent from the
drop down arrow (Image 11).
Image 11: Selection
options in the Select Output Options screen

Next, we navigated to our class folders where we stored all our data. Here we were able to check and make sure everything saved properly. Here we can see the Priory_olsonton file we just went through the steps for creating (image 12). Here we also want to copy and repaste that folder. This is a backup file in case anything happens during deployment; this is will be a copy of the original file (image 12). This location also contains .apo files that are important for the check in and check out procedure (image 12). We can also see that our geodatabase and .mxd file are also located in this folder (image 12).
Image 12: Location of all the files created so far

First, you need to make sure the GPS unit is connected to
the computer with a USB port cord (image 13).
Image 13: Juno GPS
unit connected to the computer with a USB port cord

A youtube video tutorial with step by step instructions for
the outlined steps above can viewed at: http://www.youtube.com/watch?v=CzEAjP46020
Collecting Data in
the Field
Now we are ready to collect the data in the field. To do
this we turned the GPS units on and selected ArcPad 10 on the menu screen
(image 14).
Image14: Location of
ArcPad 10 on menu screen

Image 15: Selecting
Choose map to open

Image 16: Locating the
.apm file just created

Image 17: Map we be on screen once selected

Image 18: How to collect data using the Trimble Juno GPS unit in the
field

Checking the Data Back in from the Juno GPS unit
Once data collection in the
field is complete we got our data from the GPS unit onto a computer. To do this
we hooked the GPS back up to a computer with a USB cord and navigate to the GPS
unit’s SD location. From there we copied and pasted the folder back into our
CheckInOut folder.
Next, we selected the Get
Data From AcrPad (image 19) button on the Arc Pad Data Manager toolbar.
Image 19: Location of the Get Data From AcrPad button on the Arc Pad
Data Manager toolbar

Image 20: Location of buttons to retrieve data and check it in

Image 21: Data collected on Juno GPS unit is all in ArcMap

Image 22 depicts the data I
collected with my GPS unit. The attributes I collected included information
regarding how the trails were utilized. Here we can see that the two categories
include driving and walking trails. Since the trails weren’t labeled their use
was determined in regards to the size and surface of the trail. If the trail
was wide and paved I labeled it as driving and if the it was thin, dirt and
through the woods I labeled it walking.
Image 22: Trail data I collected in regards to the type of use of the
trail

Image 23: Trail data collected in regards to the type of use, surface,
and conditions of the trail

Conclusion
Overall, I thought this was
a very fun project. I think the idea of being able to create, not only a new
map but a database that contains useful information about a place is very
powerful. I think the Trimble Juno GPS units are very effective tools. It would
be very cool to see a map of the all the data that was collected by all the
groups mapped together.
One thing that became very
apparent when creating the maps was the fact that we didn’t use the domains
that we created before deploying our projects to our GPS units. As discussed earlier,
for whatever reason, our domains didn’t transfer with our projects onto our GPS
units. This didn’t really provide a problem in the field for our data
collection due to there being only a few trails. However, had there been a ton
of trails or had we had been collecting a lot of data for a very tedious
project this would’ve proved very inefficient. While making the maps I did come
across two separate instances where I had to fix the attribute table in order
for everything to map correctly. For example “ok” in the conditions column was
spelled with both letters lowercase and other times with the “O” as a capital
letter. When attempting to map conditions in this way they show up as two
separate attributes instead of just one. However, like I said before, this was
an easy fix since there were only a few maps. Had there been a huge database
with this issue fixing it would’ve taken much longer and would’ve been very
irritating.